


Awards
| Model Name | Model Identifier | Subfamily | Order No | Model No |
| MacBook Pro "Core i7" 2.6 15" Mid-2012 | MacBookPro9,1 | Mid-2012 15" | MD104LL/A | A1286 (EMC 2556*) |
| MacBook Pro "Core i7" 2.7 15" Mid-2012 | MacBookPro9,1 | Mid-2012 15" | BTO/CTO | A1286 (EMC 2556*) |
| MacBook Pro "Core i7" 2.3 15" Mid-2012 | MacBookPro9,1 | Mid-2012 15" | MD103LL/A | A1286 (EMC 2556*) |
| MacBook Pro "Core i5" 2.5 13" Mid-2012 | MacBookPro9,2 | Mid-2012 13" | MD101LL/A | A1278 (EMC 2554*) |
| MacBook Pro "Core i7" 2.9 13" Mid-2012 | MacBookPro9,2 | Mid-2012 13" | MD102LL/A | A1278 (EMC 2554*) |
| iMac "Core i5" 2.7 21.5-Inch (Late 2012) | iMac13,1 | Late 2012 | MD093LL/A | A1418 (EMC 2544) |
| iMac "Core i3" 3.3 21.5-Inch (Early 2013) | iMac13,1 | Early 2013 (Edu) | ME699LL/A | A1418 (EMC 2545) |
| iMac "Core i7" 3.1 21.5-Inch (Late 2012) | iMac13,1 | Late 2012 | BTO/CTO | A1418 (EMC 2544) |
| iMac "Core i5" 2.9 21.5-Inch (Late 2012) | iMac13,1 | Late 2012 | MD094LL/A | A1418 (EMC 2544) |
| iMac "Core i5" 2.9 27-Inch (Late 2012) | iMac13,2 | Late 2012 | MD095LL/A | A1419 (EMC 2546) |
| iMac "Core i5" 3.2 27-Inch (Late 2012) | iMac13,2 | Late 2012 | MD096LL/A | A1419 (EMC 2546) |
| iMac "Core i7" 3.4 27-Inch (Late 2012) | iMac13,2 | Late 2012 | BTO/CTO | A1419 (EMC 2546) |
| Mac mini "Core i5" 2.5 (Late 2012) | Macmini6,1 | Late 2012 | MD387LL/A | A1347 (EMC 2570) |
| Mac mini "Core i7" 2.6 (Late 2012/Server) | Macmini6,2 | Late 2012 | BTO/CTO | A1347 (EMC 2570) |
| Mac mini "Core i7" 2.6 (Late 2012) | Macmini6,2 | Late 2012 | BTO/CTO | A1347 (EMC 2570) |
| Mac mini "Core i7" 2.3 (Late 2012/Server) | Macmini6,2 | Late 2012 | MD389LL/A | A1347 (EMC 2570) |
| Mac mini "Core i7" 2.3 (Late 2012) | Macmini6,2 | Late 2012 | MD388LL/A | A1347 (EMC 2570) |
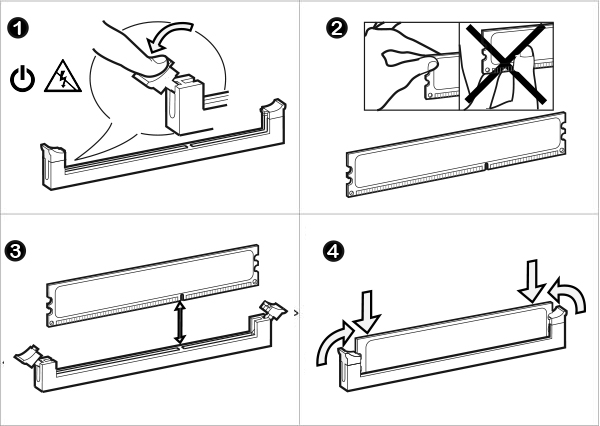
Memory Module InstallationThe installation of memory modules is a quick and easy process. No matter the type of your memory or computer, this installation guide will help you get your new iRam Technology memory up and running. |
|
|
Step 1: Shut down your computer. Locate the memory expansion slots on your motherboard or notebook. (Please refer to computer Manufacturer Manual) Step 2: Please follow all precautions for handling electrostatic discharge (ESD) sensitive devices.. Step 3: Push open the retainer clips (as illustrated in Image 3). Step 4: Memory modules fit one way only; align the notch in the memory module's gold pins with the notch in the memory installation slot. Push firmly on the top of the module until it is properly seated. The retainer clips will ease into the notches at either horizontal edge of the modules. Step 5: Installation complete! Your computer is now iRam Technology enhanced. |
|